We designed this custom storage couch with our budget and unique storage needs in mind for living comfortably in our tiny house. The finished product allows for ample storage, both behind the back rest and within the ottomans that slide underneath the bench of the couch. For overnight guests, the couch converts effortlessly to a full size bed.
This design was inspired by the Ana White’s storage sofa tutorial. Her DIY guide was fantastic and really helped us decide how we wanted to make our own to best suite our needs!
The dimensions listed below were based off of the width of the pads purchased (24″ wide by 3″ thick) and by the space we have to work with in our Epic Tiny House. So feel free to adjust your design to best suit your individual needs and the foam you choose to use.
This storage couch project will cost you approximately $220 if you needed to purchase all of the supplies necessary. We had extra screws and 1/4″ plywood on hand, so our total cost was probably around $150.
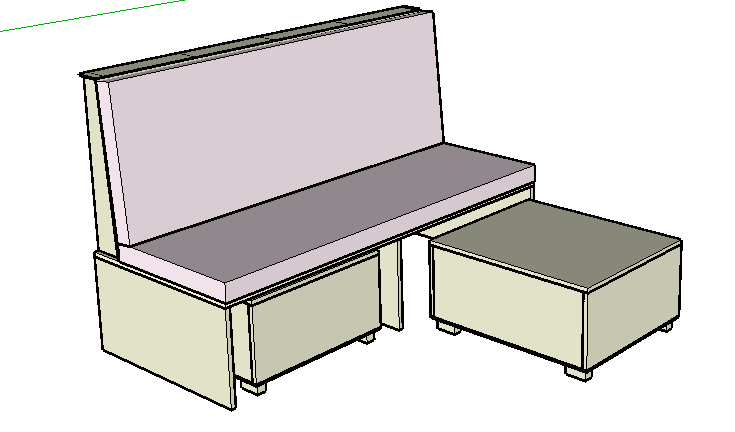
Table of Contents
Tools Needed:
- Table Saw or Skill Saw/Circular Saw (or have your local home improvement store cut down the wood to the sizes you need) – we used our Ryobi Table Saw
- Drill
- Pre-drill bit
- Screw bit
- Sewing Machine
- Tape Measure
- Safety Glasses
- Speed Square
- Pencil
Supplies Needed:
- 2 – 4′ x 8′ (48″ x 96″) 3/4 inch plywood: $34.98 each
- 2 – 4′ x 8′ (48″ x 96″) 1/4 inch plywood: $11.97 each
- 1 – 2 x 4 approximately 2 ft in length (only required if placing feet on bottom of ottomans) Approx. $2
- 10 felt moving pads (for ottomans): $2.67
- 24″ wide x 3″ thick Foam Pad: about $50 (price varies and quantity depends on the amount you want for seat and back rest for your storage couch.)
- 7 – 60″ wide yards Natural Canvas Fabric (or can purchase a drop cloth for the same purpose): $47.95
- 1 – Sullivans Invisible Make-A-Zipper-Kit, 4 1/2 Yards, Cream (to make two zippers for cushions): $10.74
- 1/4″ Screws
- 1 – 30″ Continuous Hinge (also called a piano hinge): $9
- Cream Thread
- Paint and/or Stain
- Dimensions: 67″ long x 42 7/8″ tall x 30″ deep (24″ for seat depth, 6″ for back rest)
Cut List:
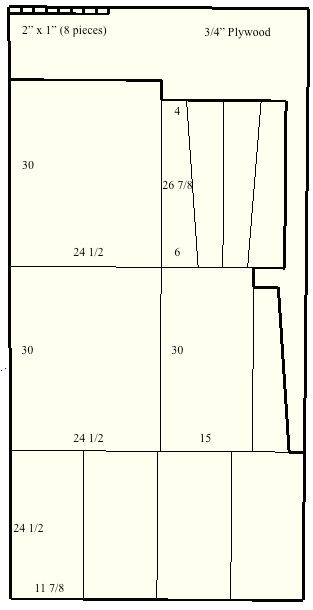
- 3 – 3/4″ Plywood @ 30″ x 15″ for bench sides and middle support
- 1 – 3/4″ Plywood @ 30″ x 67″ for bench seat
- 5 – 3/4″ Plywood @ 6″ x 26 7/8″ x 4″ x 27″ for back rest supports (see diagram)
- 1 – 1/4″ Plywood @ 27″ x 67″ for back rest
- 1 – 1/4″ Plywood @ 4″ x 67″ for top of back rest
- 2 – 1/4″ Plywood @ 24 1/2″ x 30″ for bottom of ottomans
- 2 – 3/4″ Plywood @ 24 1/2″ x 30″ for top of ottomans
- 4 – 3/4″ Plywood @ 24 1/2″ x 11 7/8″ for front and back of ottomans
- 4 – 3/4″ Plywood @ 28 1/2″ x 11 7/8″ for sides of ottomans
- 10 – 2×4 pieces @ 1 7/8″ for legs under ottomans
- 8 – 3/4″ Plywood @ 2″ x 1″ for underside of top piece of ottomans
Step 1: Bench Seat
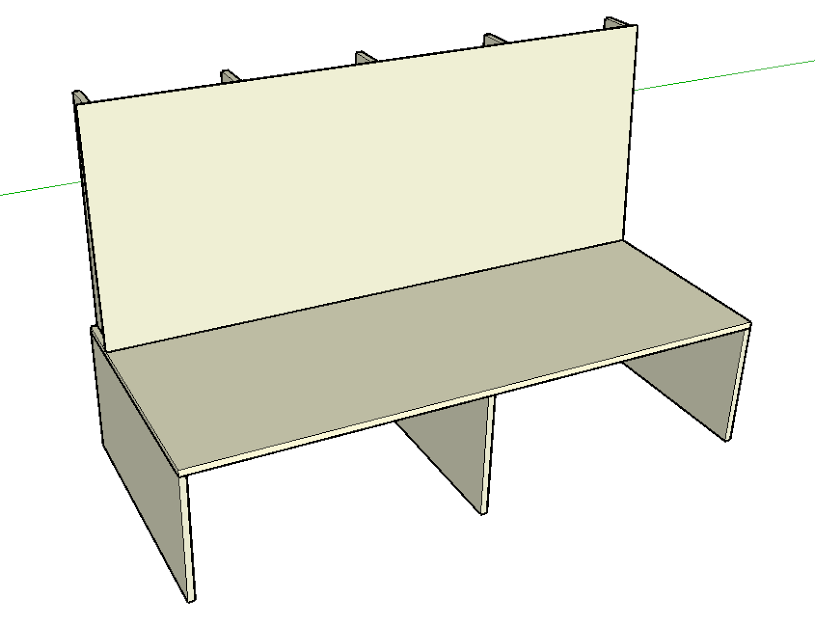
Attach 2 of the 30″ x 15″ pieces of 3/4″ plywood to the ends of the bench seat (30″ x 67″ 3/4 Plywood). Drilling down through the top of the bench seat, pre-drill and then screw in 3-4 screws.
From one edge of the bench, measure and mark 33 1/8″. Align the edge of the 3rd piece of the 3/4″ plywood on that mark and attach using screws as done with the end pieces. This supports the end and center of your bench seat.

Step 2: Backing
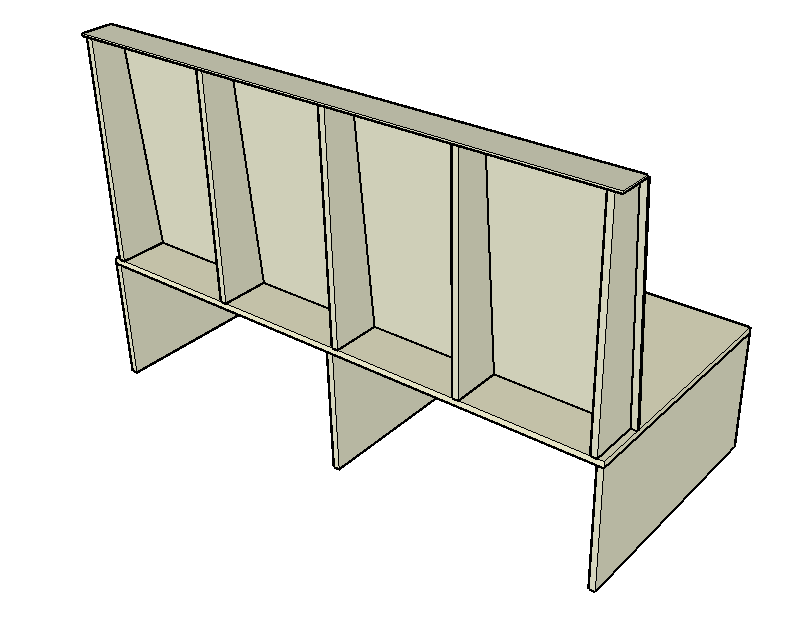
Determine which edge of the bench will be the back of your couch. When facing the couch head on, from right to left on the back edge of the bench, measure and mark the following: 3/4″, 17 1/2″, 31 7/8″, 49 5/8″, and 65 1/2″. Align each of the back rest supports so that the right edge is aligned with those marks. Using two screws, pre-drill and screw up through the bench into the back supports. By using these measurements, it will offset from the bench supports and provide adequate back support.
Place the 1/4″ plywood sheet (27″ x 67″) against the back supports. Use 3-4 screws on each support and pre-drill and screw into each of the back supports.
Backing: Step 1 Backing: Step 2
Step 3: Top
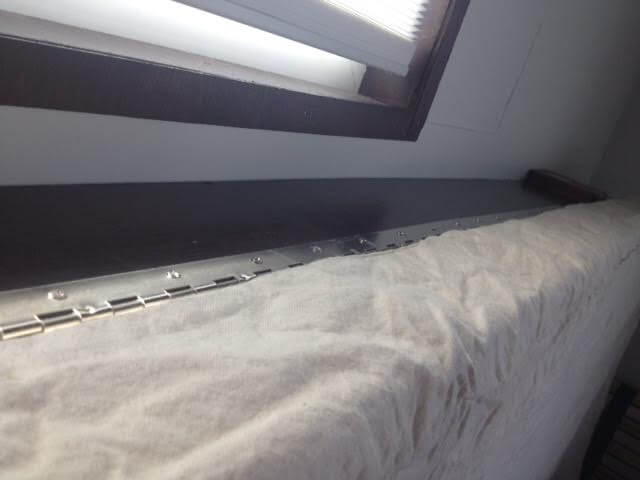
For our couch, the back rest cushion mostly conceals the top of the couch, so I opted to use a 30″ continuous hinge in the center and allowed it to be visible. Note that the screws provided with the hinge are longer than the 1/4″ plywood being screwed into, so the tips will be exposed in the storage compartment in the back of the couch. This does not interfere with my storage plans, so it’s a non-issue for us. Attach the hinge in the center on the outside of the 1/4″ plywood back rest. Attach the other side of the hinge to the 1/4″ plywood top piece. Fold down into place.
Front view Back view
Step 4: Ottomans
Align the the front and back pieces of the ottoman (3/4″ Plywood @ 24 1/2″ x 11 7/8″) with the short sides of the bottom piece of ottoman (1/4″ Plywood @ 24 1/2″ x 30″). Pre-drill and screw three screws through the bottom piece into the sides.
Align the side pieces of the ottoman (3/4″ Plywood @ 28 1/2″ x 11 7/8″) with the long sides of the bottom piece of ottoman. Pre-drill and drill 4 screws through the bottom piece into the sides.
Place 5 legs on the ground and lay the ottoman upright on top of the legs. Align the legs so that there is 1 in each of the corners and 1 in the middle. Pre-drill and screw down through the bottom of the ottoman into the legs, using two screws per leg.
On bottom of each leg, attach one felt moving pad.
On the top piece of ottoman (3/4″ Plywood @ 24 1/2″ x 30″), from each of the 4 edges mark 7/8″. In approximately the middle of each of the sides, align one of the 2″x 1″ 3/4″ Plywood pieces and screw through the top of the ottoman into the supports. These will sit down inside the ottoman when the lid is closed to keep the lid from shifting.
Repeat steps for second ottoman.
Note: These ottomans are smaller than the width of the space under the couch by approximately 5 1/2″. This was done so that all of the pieces could be cut out of 2 sheets of 3/4″ Plywood instead of purchasing a 3rd sheet. If you want to maximize the space under the couch and have ottoman’s the fit fairly snugly under the bench seat, change the width of the front and back pieces as well as the top and bottom pieces from 24 1/2″ to 30-31″, as the total space is 32 3/8″.
Step 5: Paint/Stain
Using the paint or stain of your choice, paint the sides and top of the ottomans. Paint the top piece of the back rest, the sides of the couch, and the front edge of the bench seat. You may also want to paint the inside of the bench seat for when the ottomans are not being stored.
Step 6: Cushions
Cut the following out pieces out of the 7 yards of 60″ wide canvas for the 2 cushions. These are the dimensions of the cushions plus 1/2″ for hemming.
- 4 – 67 1/2″ x 24 1/2″
- 2 – 67″ x 3 1/2″
- 4 – 67″ x 1 3/4″
- 4 – 24 1/2″ x 3 1/2″
Note: You should either purchase canvas that is pre-shrunk, wash it before cutting it, or add in at least 15% to these measurements to account for shrink. I opted for the last option and regretted it as it shrunk more than I anticipated, so I had to go back and add more fabric back in.
Cut the 4 1/2 yards of zipper down to two zippers, each 65″ long. Attach the zipper pull to each zipper. Align the right edge of the zipper with the right edge of the 1 3/4″ piece of fabric, approximately 2 inches from each end. Use pins to hold it in place. Sew on the one edge of the zipper. Zip up the zipper and align the second edge to the second piece of 1 3/4″ piece of fabric, making sure that the two pieces of fabric are aligned. Pin into place. Unzip the zipper and sew second edge into place.
Sew the right sides of the fabric together, creating a square box cushion case. Pull the fabric back through the zipper, thus hiding all edges of the fabric.
On the two foam pads, measure and cut down to 67″ long. Stuff foam into cushion case. Lay one on the bench seat of couch (zipper facing the back rest) and then one on top of the bench seat couch cushion and against the back rest.
Storage couch pulled out into a bed Mrs. Epic on our finished storage couch bed
Final Step: Kick back and enjoy!
- About the Author
- Latest Posts
The DIY Tiny House idea started in 2014. A complete DIY process, Will and Alicia did everything themselves from drawing up the plans, building the framework, electrical, plumbing, and finishing touches and appliance selections.
Over several years, they documented what it was like to live in a Tiny House, conducting very thorough research on how to solve the many issues and problems which come up. In 2019, they sold their Tiny House as their lives continued to evolve and change.
You can continue to follow the lives of Will and Alicia at @ironwillruns on Instagram.


